切换至中文
To create WeChat work app:
Step 1 :Install forwarding service
(1)Install Tomcat Server
(2)Intall weChatToolKits.war(DownLoad)
Supplement: If the click fails, please right-click to copy the link, paste in the new window and download
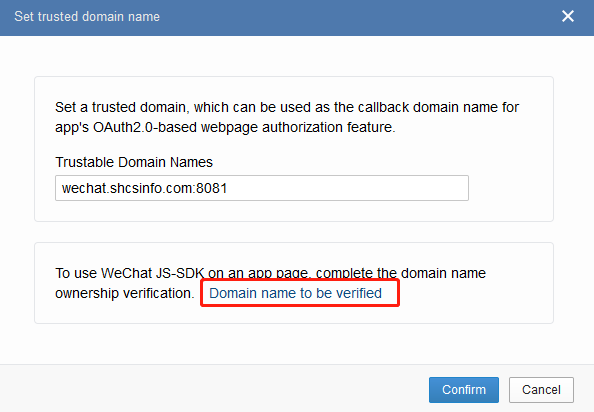
(3)Set a trusted domain, which can be used as the callback domain name for app's OAuth2.0-based webpage authorization feature.
Complete installation software:
Window :DownLoad Linux :DownLoad
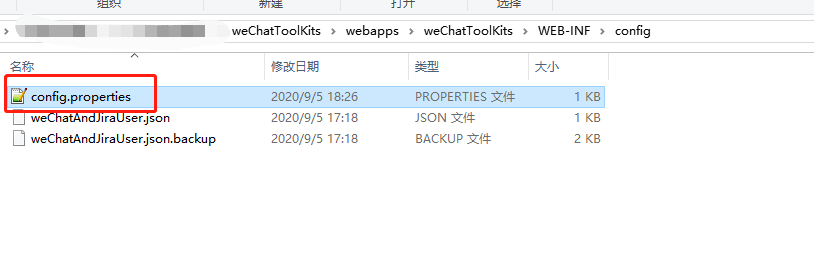
Browse directory:weChatToolKits
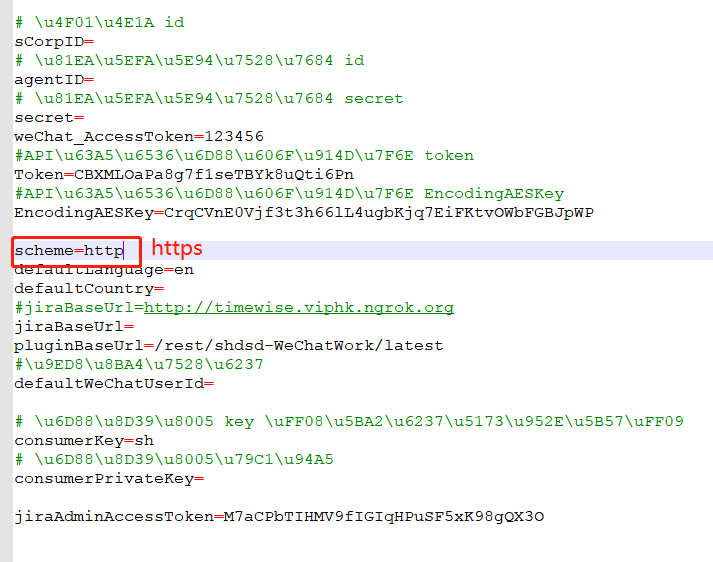
Supplement: If Jira deploys https, then the transit server needs to support https, please modify the configuration information under webapps\weChatToolKits\WEB-INF\config.properties:
Step2:Sign in your https://work.weixin.qq.com
Step3:Select App Management ->Apps
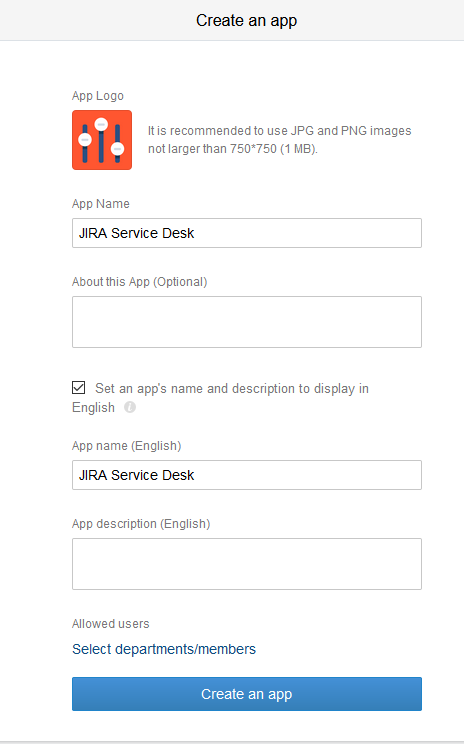
Step4:Input Create an app create your App
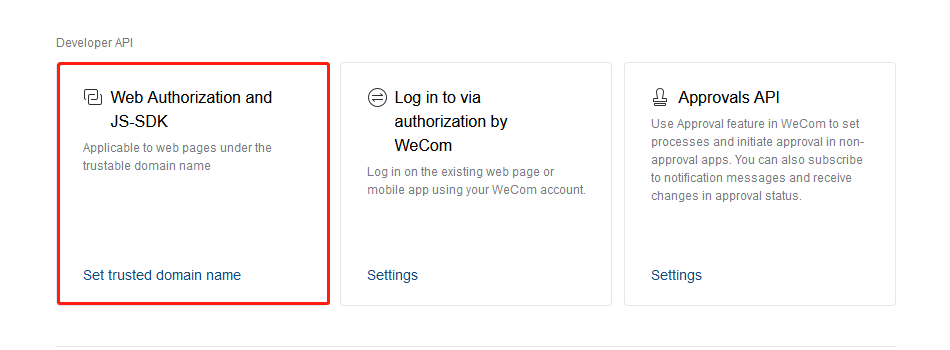
Step5:Web Authorization and JS-SDK
(1)Select Web Authorization and JS-SDK
(2)Set a trustes domain
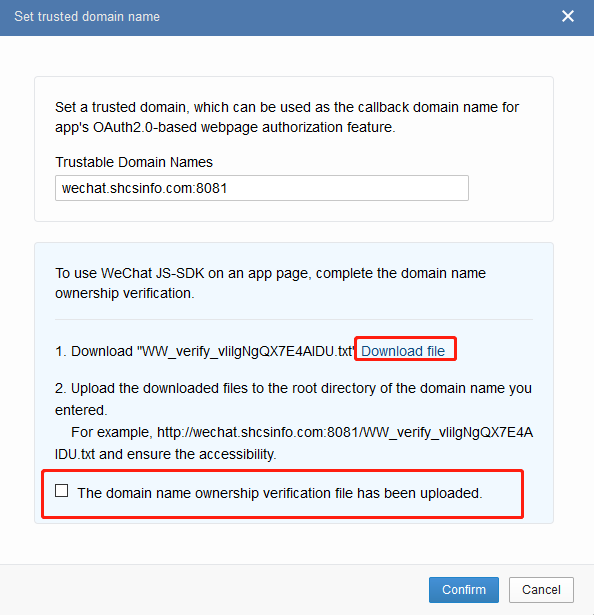
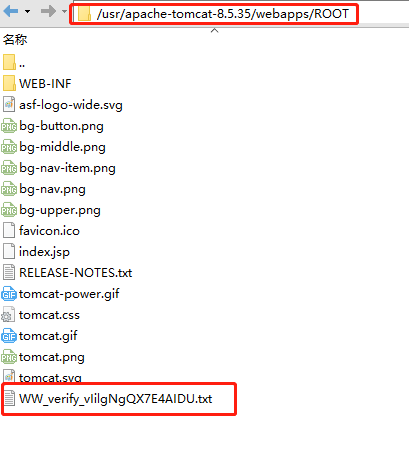
(3) Download the file and update it to the transfer service website
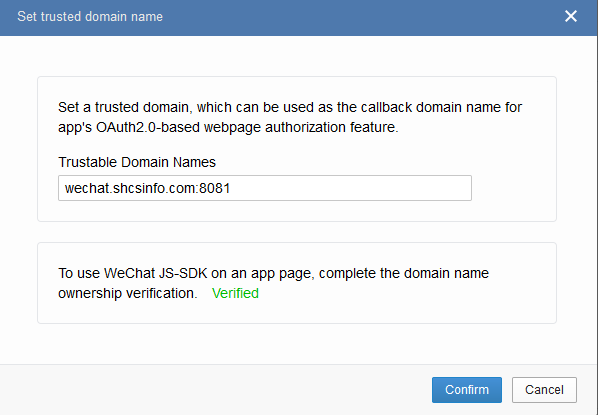
(4)Authentication is successful
Step6:Set Workplace App Homepage
(1)Set Workplace App Homepage
Sample: http://wechat.shcsinfo.com:8081/weChatToolKits/wechat/index


To set up WeChat App for Jira Service Management:
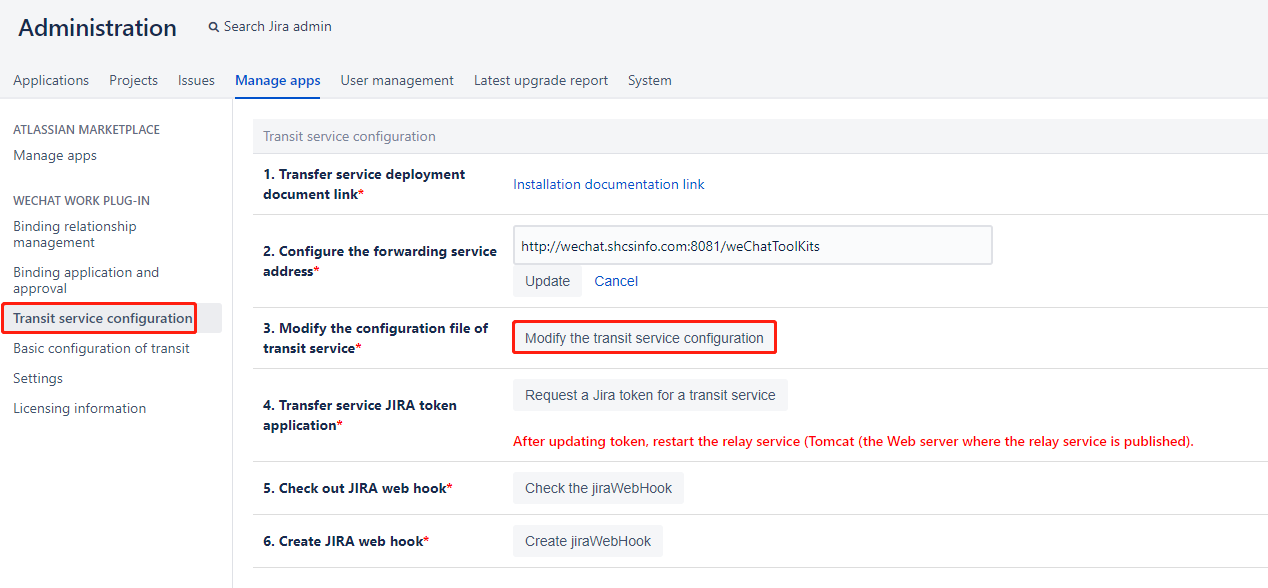
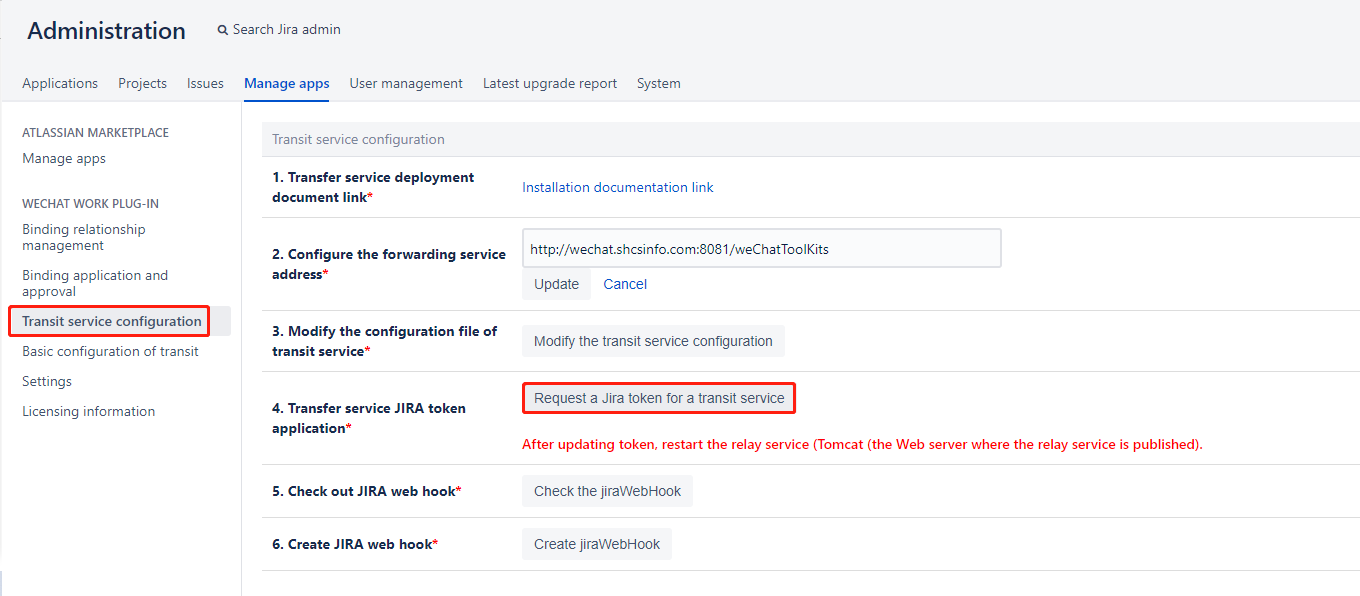
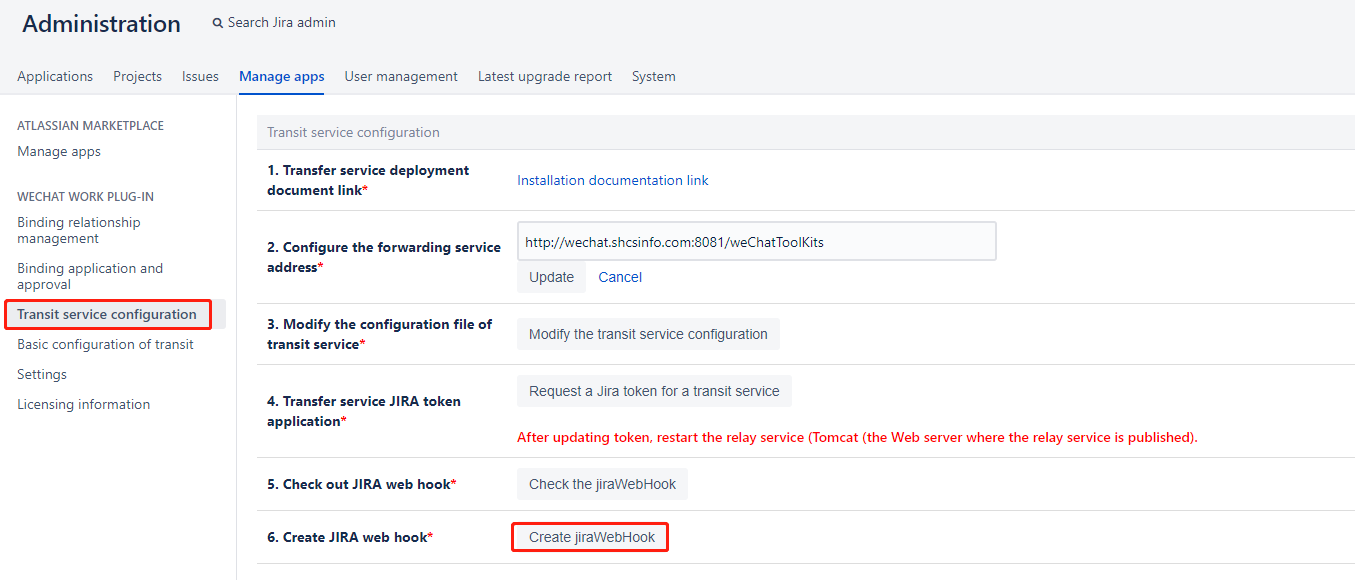
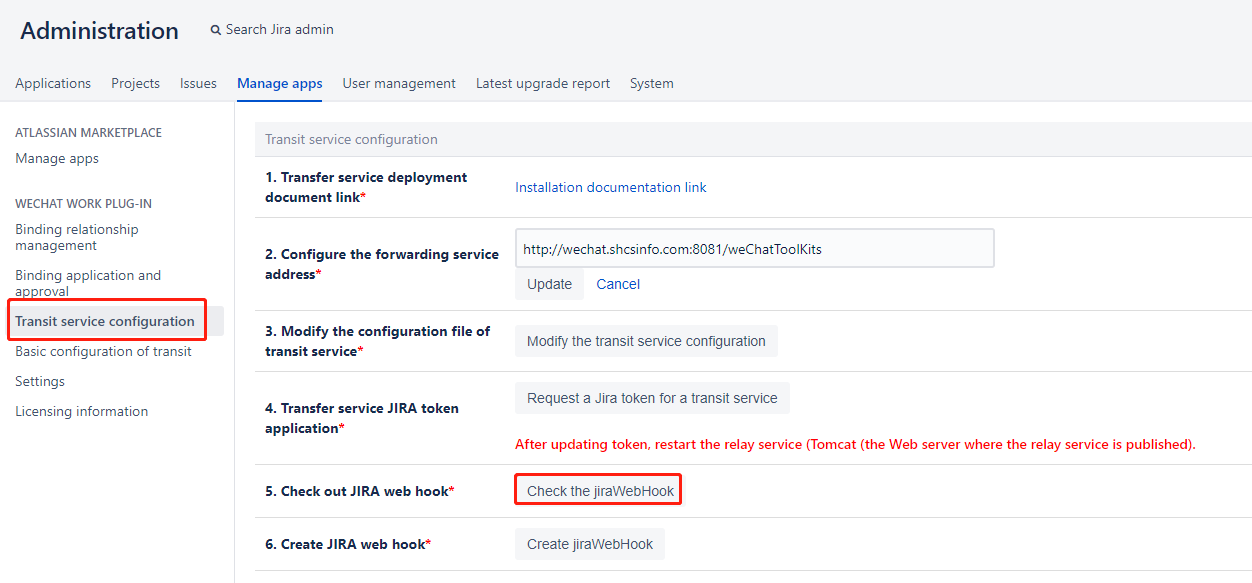
Step1:Select “Transit service configuration“
Step2:Set configure the forwarding service address
Update forwarding service address: Domain +enterPriseWeChatToolKits
Sample : : http://wechat.shcsinfo.com:8081/weChatToolKits

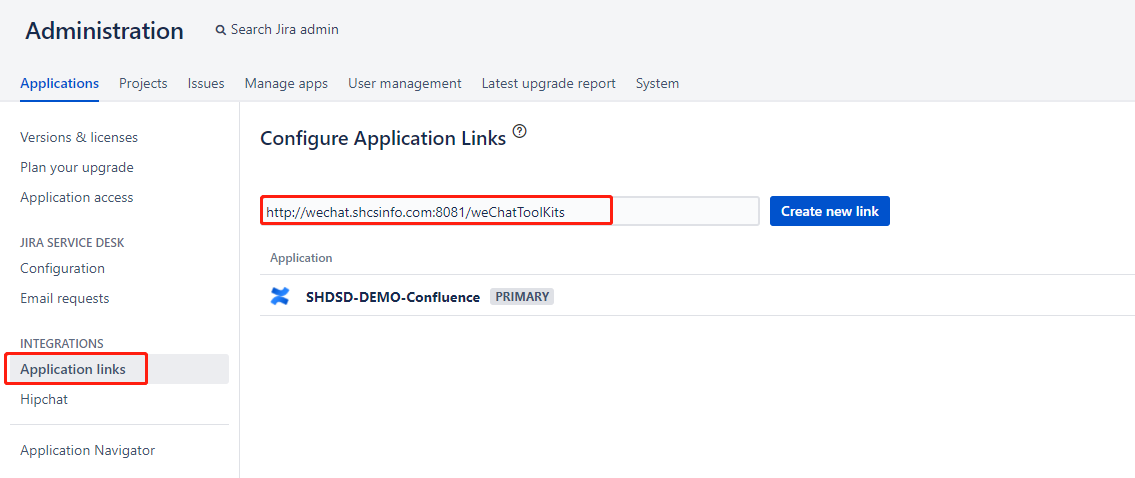
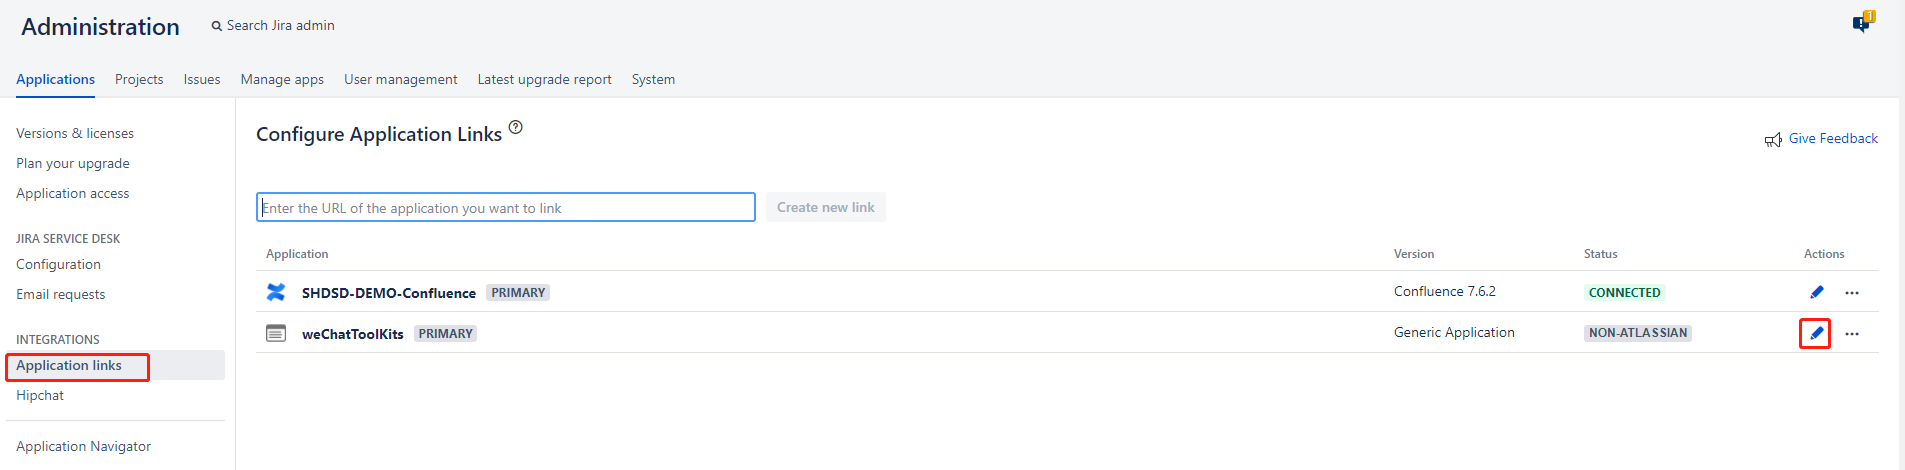
Step3:Create application links
In Jira, navigate to the gear icon > application > application link.
In the field, enter the url of the application you want to link to, and enter the url you want to link to (relay service address, such as: http://wechat.shcsinfo.com:8081/weChatToolKits , then click create new link.
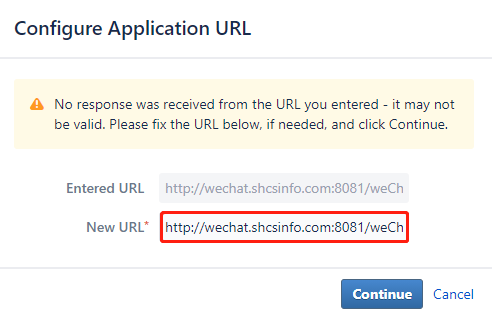
You receive a warning message saying, "No response to the url you entered." Ignore it and click Continue. The pop-up dialog box is as follows:
(1)Create application new link
(2)Set configure application URL
(3)Set link applications
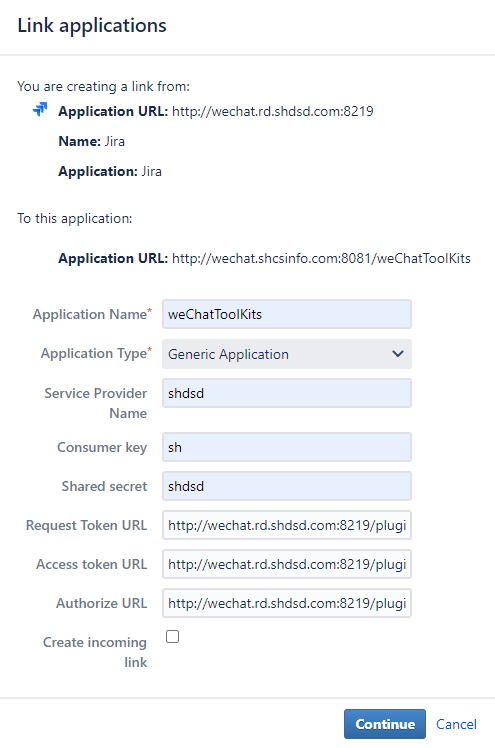
Among them, such as name of transit address for http://wechat.shcsinfo.com:8081/weChatToolKits application recommended project name namely (weChatToolKits);
Application type selection general application;
shdsd is recommended by the service provider;
Request token URL fill in: Jira system baseUrl + /plugins/servlet/oauth/request-token
Access token URL fill in: Jira system baseUrl + /plugins/servlet/oauth/access-token
Fill in the authentication URL: Jira system baseUrl + /plugins/servlet/oauth/oauth/authorize
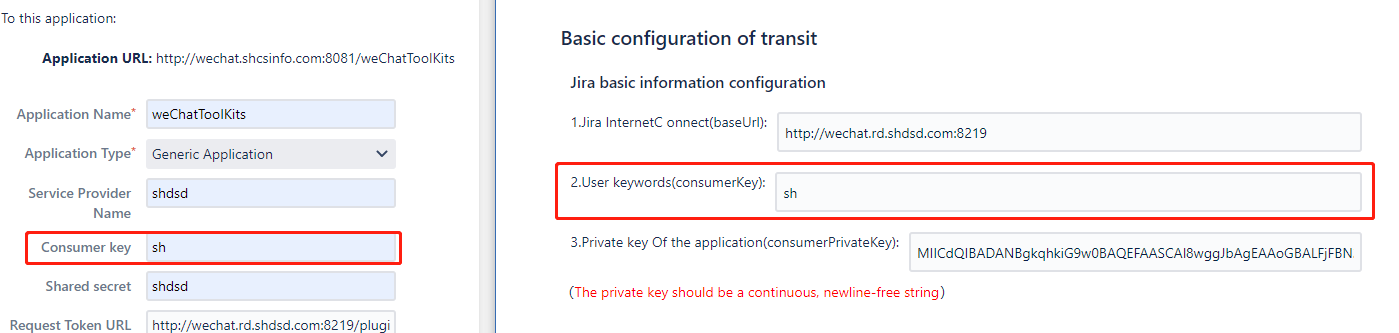
consumer Key must be consistent with the content in the basic service configuration, as shown below:
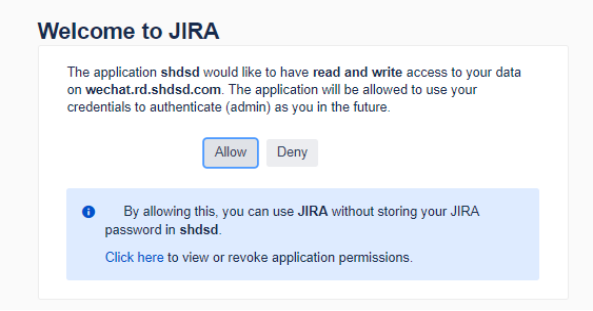
When you are done,Do not check to create incoming links, click continue. Get an application link that looks like this:
Click the little pencil icon on the application link to edit the application link. Click "incoming validation" :
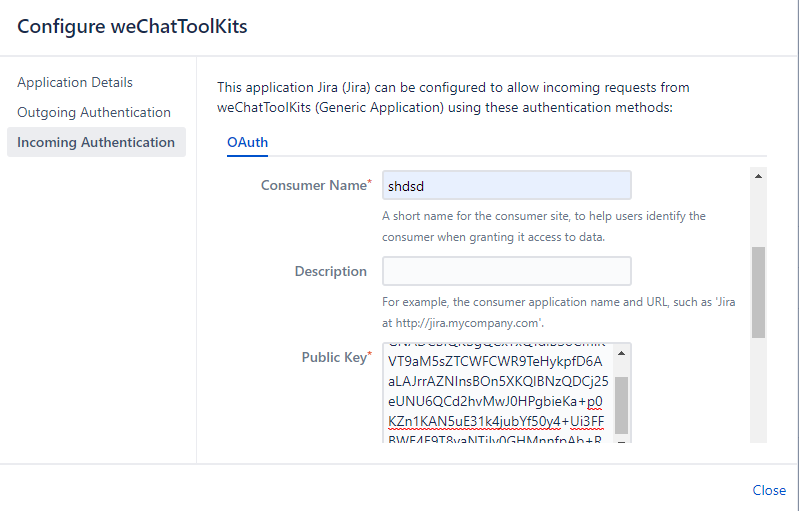
Where, the consumer key and the consumer name should be set to the same as the consumer Key in a window.
The publickey (publickey) should be copied from the jira_publickey.pem file (You need to get rid of the newline in jira_publickey.pem first. The public key should be a continuous, newline-free string);
On your PC, install openssl environment. Run the following openssl command:
openssl genrsa -out jira_privatekey.pem 1024
openssl req -newkey rsa:1024 -x509 -key jira_privatekey.pem -out jira_publickey.cer -days 365
openssl pkcs8 -topk8 -nocrypt -in jira_privatekey.pem -out jira_privatekey.pcks8
openssl x509 -pubkey -noout -in jira_publickey.cer> jira_publickey.pem
After running the above command, several files are generated. Where, the file jira_privatekey.pcks8 contains the privatekey; The publickey is stored in the jira_publickey.pem file.
Customer callback URL filling: Forwarding service address + /page/getAccessToken.
When you have finished typing, click Continue. The application link is created.
Step4:Set basic configuration of transit
(1)Update transit service configuration
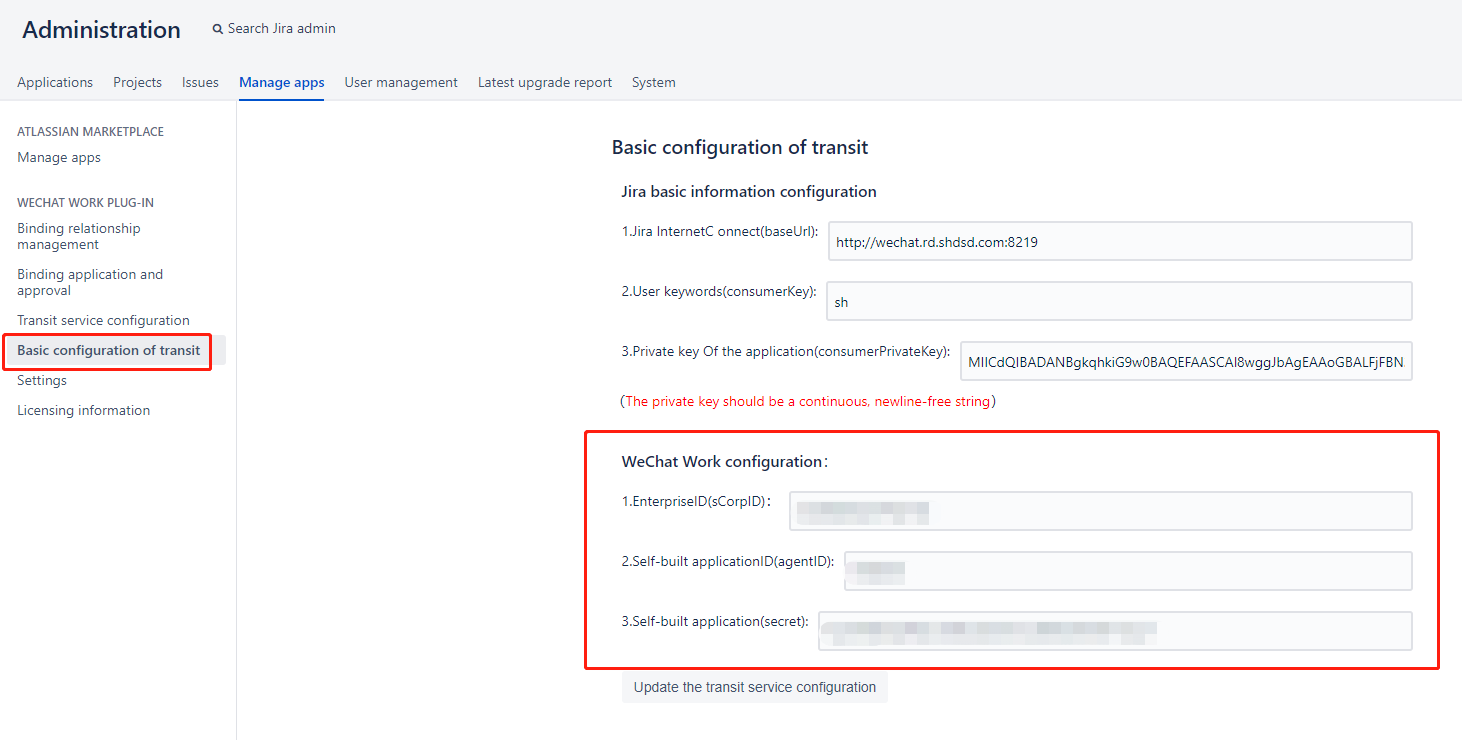
WeChat Work configuration:
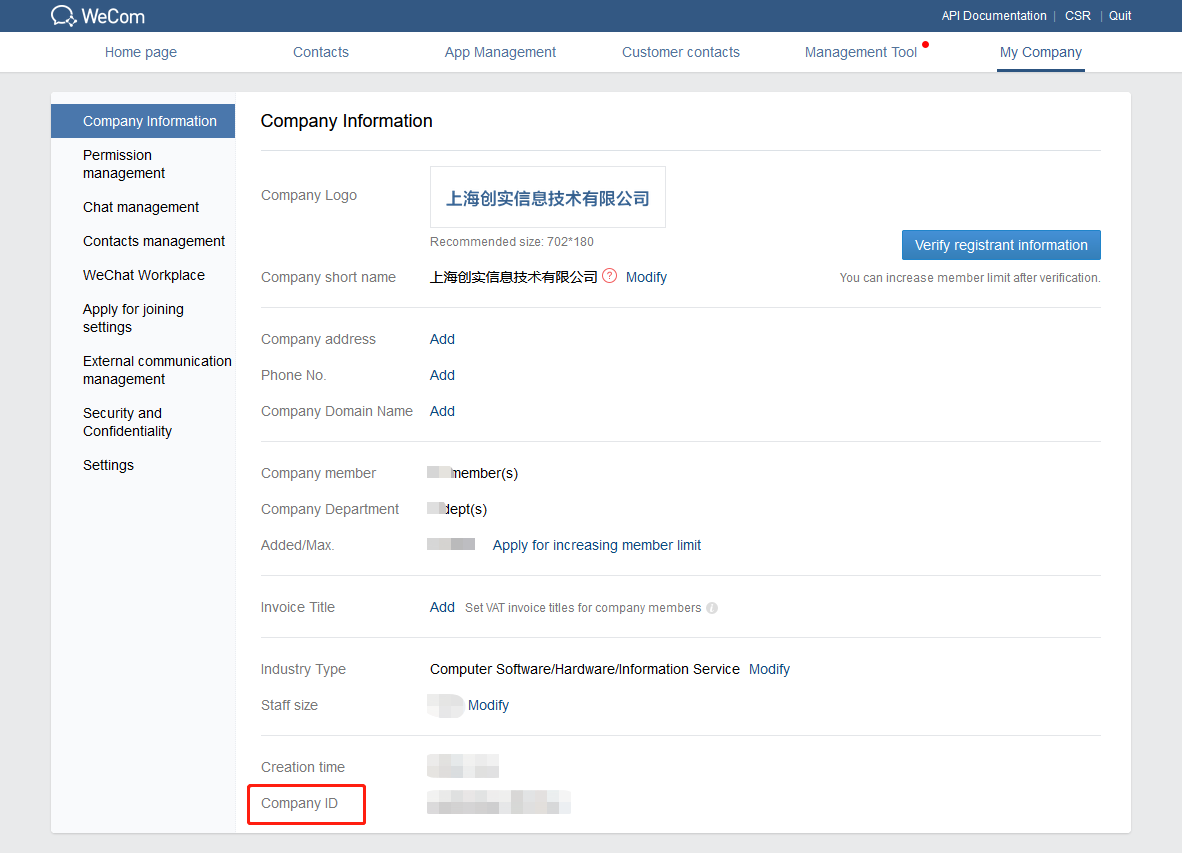
1.sCorpID:
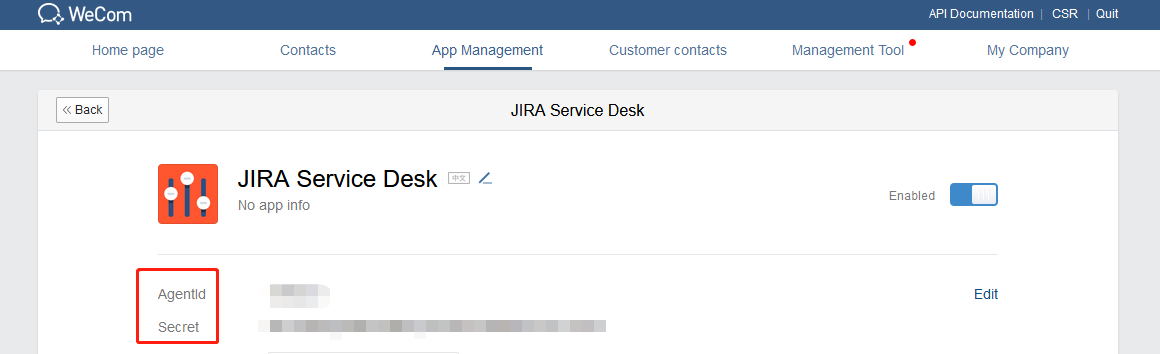
2.AgentID & Secret
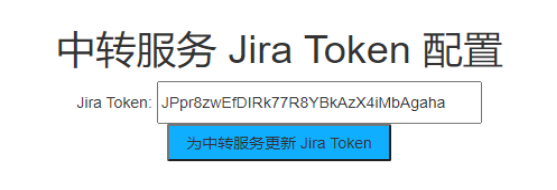
(2)Update Jira token
Step5:Restart transit service
To set up WeChat App for Jira Service Management message push:
Step1:Set configure message push
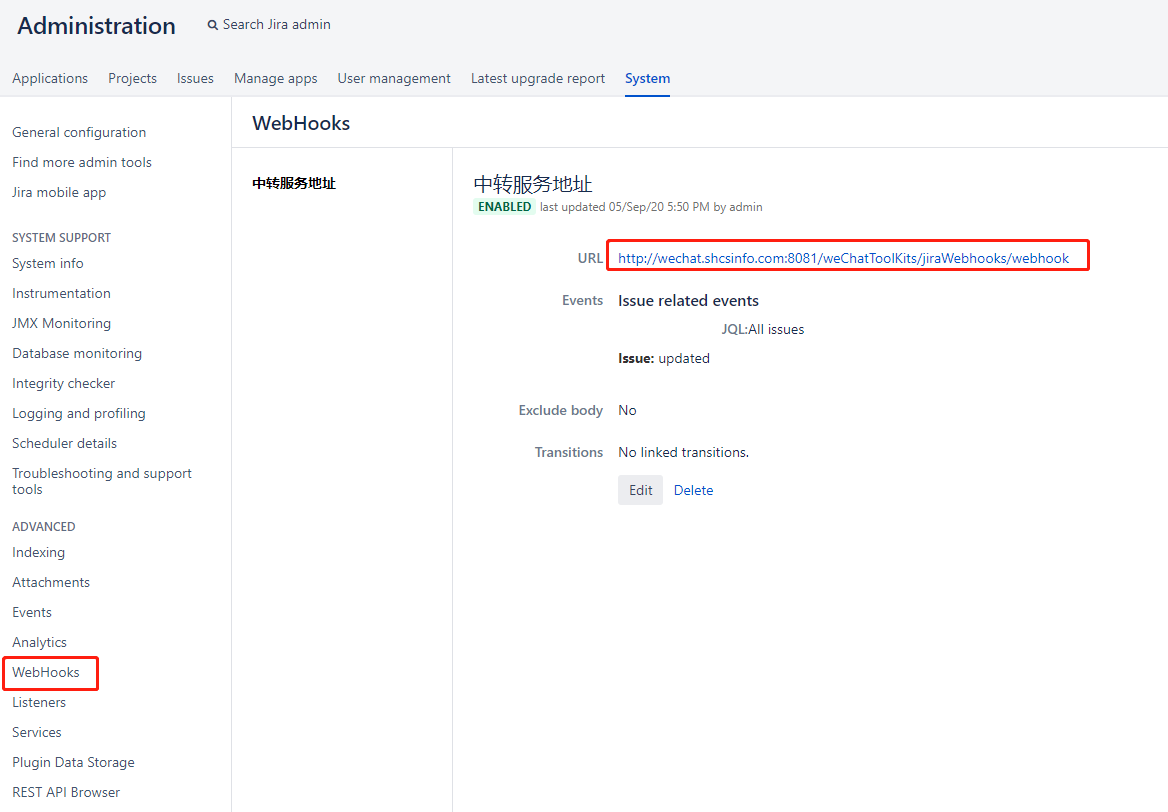
(1)Create the jiraWebHook message push address corresponding to the forwarding service address;
(2)Check jiraWebHook
Check your WeChat App :
